Description
_compile
介绍完响应式的部分,算是开了个头了,后面的内容很多,但是层层递进,最终完成响应式精确订阅和批处理更新的整个过程,过程比较流程,内容耦合度也高,所以我们先来给后文的概览,介绍一下大体过程。
我们最开始的代码里提到了Vue处理完数据和event之后就到了$mount,而$mount就是在this._compile后触发编译完成的钩子而已,所以核心就是Vue.prototype._compile。
_compile包含了Vue构建的三个阶段,transclude,compile,link。而link阶段其实是放在linkAndCapture里执行的,这里又包含了watcher的生成,指令的bind、update等操作。
我先简单讲讲什么是指令,虽然Vue文档里说的指令是v-if,v-for等这种HTML的attribute,其实在Vue内部,只要是被Vue处理的dom上的东西都是指令,比如dom内容里的{{a}},最终会转换成一个v-text的指令和一个textNode,而一个子组件<component><component>也会生成指令,还有slot,或者是你自己在元素上写的attribute比如hello={{you}}也会被编译为一个v-bind指令。我们看到,基本只要是涉及dom的(不是响应式的也包含在内,只要是vue提供的功能),不管是dom标签,还是dom属性、内容,都会被处理为指令。所以不要有指令就是attribute的惯性思维。
回过头来,_compile部分大致分为如下几个部分
-
transclude
transclude的意思是内嵌,这个步骤会把你template里给出的模板转换成一段dom,然后抽取出你el选项指定的dom里的内容(即子元素,因为模板里可能有slot),把这段模板dom嵌入到el里面去,当然,如果replace为true,那他就是直接替换el,而不是内嵌。我们大概明白transclude这个名字的意义了,但其实更关键的是把template转换为dom的过程(如<p>{{a}}<p>字符串转为真正的段落元素),这里为后面的编译准备好了dom。 -
compile
compile的的过程具体就是遍历模板解析出模板里的指令。更精确的说是解析后生成了指令描述对象。
同时,compile函数是一个高阶函数,他执行完成之后的返回值是另一个函数:link,所以compile函数的第一个阶段是编译,返回出去的这个函数完成另一个阶段:link。 -
link
compile阶段将指令解析成为指令描述对象(descriptor),闭包在了link函数里,link函数会把descriptor传入Directive构造函数,创建出真正的指令实例。此外link函数是作为参数传入linkAndCaptrue中的,后者负责执行link,同时取出这些新生成的指令,先按照指令的预置的优先级从高到低排好顺序,然后遍历指令执行指令的_bind方法,这个方法会为指令创建watcher,并计算表达式的值,完成前面描述的依赖收集。并最后执行对应指令的bind和update方法,使指令生效、界面更新。此外link函数最终的返回值是unlink函数,负责在vm卸载时取消对应的dom到数据的绑定。
是时候回过头来看看Vue官网这张经典的图了,以前我刚学Vue时也是对于Watcher,Directive之类的概念云里雾里。但是现在大家看这图是不是很清晰明了?
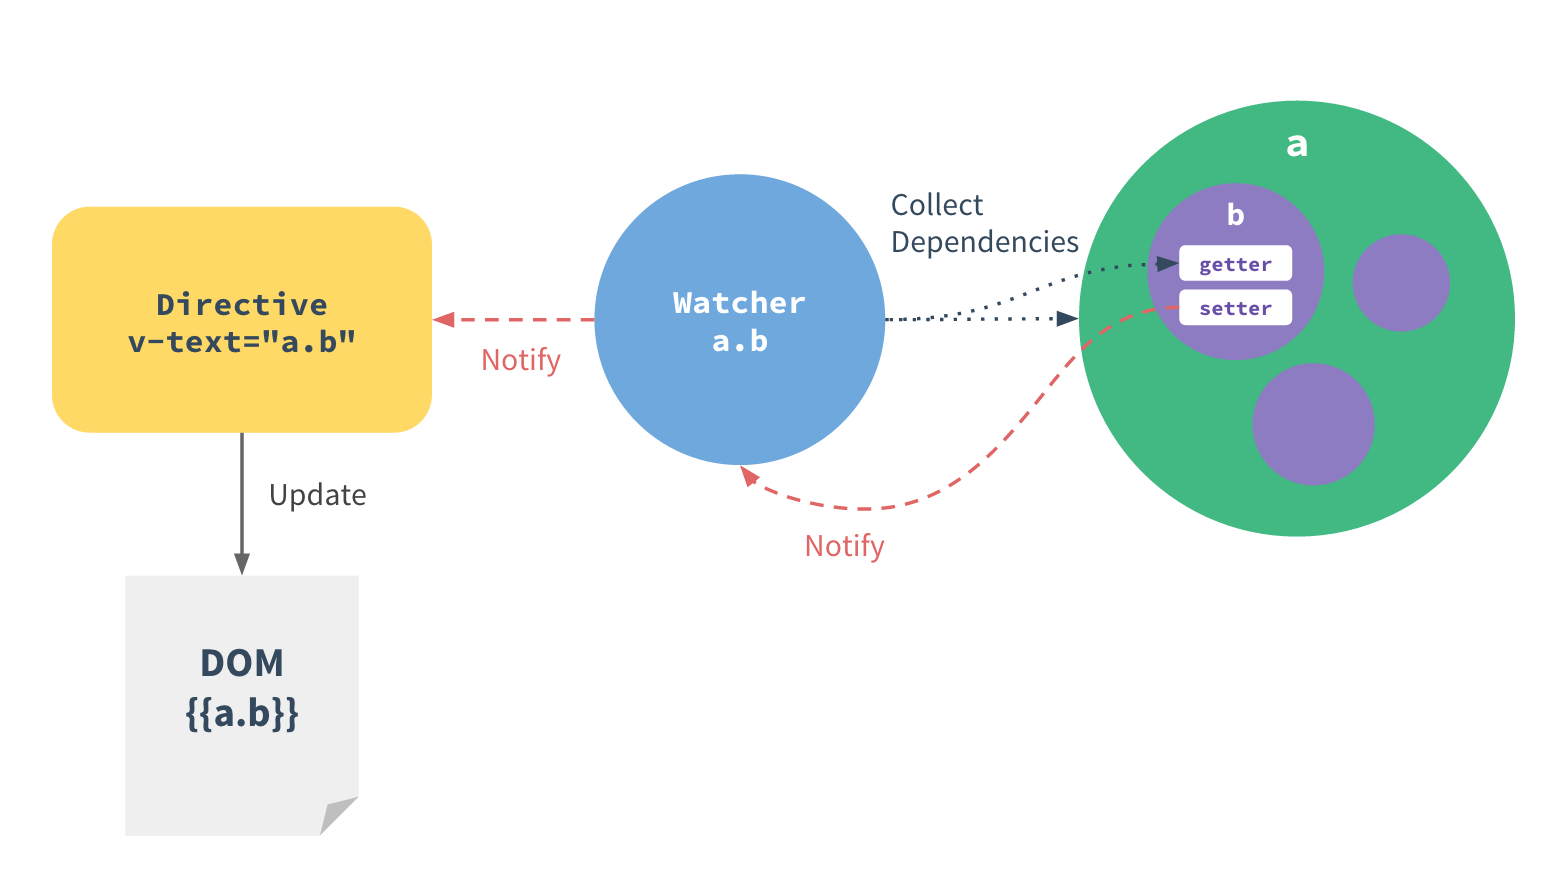
模板中每个指令/数据绑定都有一个对应的 watcher 对象,在计算过程中它把属性记录为依赖。之后当依赖的 setter 被调用时,会触发 watcher 重新计算 ,也就会导致它的关联指令更新 DOM。 --Vue官网
上代码:
Vue.prototype._compile = function (el) {
    var options = this.$options

    // transclude and init element
    // transclude can potentially replace original
    // so we need to keep reference; this step also injects
    // the template and caches the original attributes
    // on the container node and replacer node.
    var original = el
    el = transclude(el, options)
    // 在el这个dom上挂一些参数,并触发'beforeCompile'钩子,为compile做准备
    this._initElement(el)

    // handle v-pre on root node (#2026)
	// v-pre指令的话就什么都不用做了。
    if (el.nodeType === 1 && getAttr(el, 'v-pre') !== null) {
      return
    }

    // root is always compiled per-instance, because
    // container attrs and props can be different every time.
    var contextOptions = this._context && this._context.$options
    var rootLinker = compileRoot(el, options, contextOptions)

    // resolve slot distribution
	// 具体是将各个slot存储到vm._slotContents的对应属性里面去,
	// 然后后面的compile阶段会把slot解析为指令然后进行处理
    resolveSlots(this, options._content)

    // compile and link the rest
    var contentLinkFn
    var ctor = this.constructor
    // component compilation can be cached
    // as long as it's not using inline-template
	// 这里是组件的情况才进入的,大家先忽略此段代码
    if (options._linkerCachable) {
      contentLinkFn = ctor.linker
      if (!contentLinkFn) {
        contentLinkFn = ctor.linker = compile(el, options)
      }
    }

    // link phase
    // make sure to link root with prop scope!
    var rootUnlinkFn = rootLinker(this, el, this._scope)
	// compile和link一并做了
    var contentUnlinkFn = contentLinkFn
      ? contentLinkFn(this, el)
      : compile(el, options)(this, el)

    // register composite unlink function
    // to be called during instance destruction
    this._unlinkFn = function () {
      rootUnlinkFn()
      // passing destroying: true to avoid searching and
      // splicing the directives
      contentUnlinkFn(true)
    }

    // finally replace original
    if (options.replace) {
      replace(original, el)
    }

    this._isCompiled = true
    this._callHook('compiled')
  }
尤雨溪的注释已经极尽详细,上面的代码很清晰(如果你用过angular,那你会感觉很熟悉,angular里也是有transclude,compile和link的,虽然实际差别很大)。我们在具体进入各部分代码前先说说为什么dom的编译要分成compile和link两个phase。
在组件的多个实例、v-for数组等场合,我们会出现同一个段模板要绑定不同的数据然后分发到dom里面去的需求。这也是mvvm性能考量的主要场景:大数据量的重复渲染生成。而重复渲染的模板是一致的,不一致的是他们需要绑定的数据,因此compile阶段找出指令的过程是不用重复计算的,只需要link函数(和里面闭包的指令),而模板生成的dom使用原生的cloneNode方法即可复制出一份新的dom。现在,复制出的新dom+ link+具体的数据即可完成渲染,所以分离compile、并缓存link使得Vue在渲染时避免大量重复的性能消耗。
transclude函数
这里大家可以考虑一下,我给你一个空的documentFragment和一段html字符串,让你把html生成dom放进fragment里,你应该怎么做?innerHTML?documentFragment可是没有innerHtml的哦。那先建个div再innerHTML?那万一我的html字符串的是tr元素呢?tr并不能直接放进div里哦,那直接用outerHTML?没有parent Node的元素是不能设置outerHTML的哈(parent是fragment也不行),那我先用正则提取第一个标签,先createElement这个标签然后在写他的innerHTML总可以了吧?并不行,我没告诉你我给你的这段HTML最外层就一个元素啊,万一是个片段实例呢(也就是包含多个顶级元素,如<p>1<p><p>2<p>),所以我才说给你一个fragment当容器,让你把dom装进去。
上面这个例子说明了实际转换dom过程中,可能遇到的一个小坑,只是想说明字符串转dom并不是看起来那么一行innerHTML的事。
/**
 * Process an element or a DocumentFragment based on a
 * instance option object. This allows us to transclude
 * a template node/fragment before the instance is created,
 * so the processed fragment can then be cloned and reused
 * in v-for.
 *
 * @param {Element} el
 * @param {Object} options
 * @return {Element|DocumentFragment}
 */

export function transclude (el, options) {
  // extract container attributes to pass them down
  // to compiler, because they need to be compiled in
  // parent scope. we are mutating the options object here
  // assuming the same object will be used for compile
  // right after this.
  if (options) {
    options._containerAttrs = extractAttrs(el)
  }
  // for template tags, what we want is its content as
  // a documentFragment (for fragment instances)
  if (isTemplate(el)) {
    el = parseTemplate(el)
  }
  if (options) {
    // 如果当前是component,并且没有模板,只有一个壳
    // 那么只需要处理内容的嵌入
    if (options._asComponent && !options.template) {
      options.template = '<slot></slot>'
    }
    if (options.template) {
	//基本都会进入到这里
      options._content = extractContent(el)
      el = transcludeTemplate(el, options)
    }
  }
  if (isFragment(el)) {
    // anchors for fragment instance
    // passing in `persist: true` to avoid them being
    // discarded by IE during template cloning
    prepend(createAnchor('v-start', true), el)
    el.appendChild(createAnchor('v-end', true))
  }
  return el
}我们看上面的代码,先options._containerAttrs = extractAttrs(el),这样就把el元素上的所有attributes抽取出来存放在了选项对象的_containerAttrs属性上。因为我们前面说过,这些属性是vm实际挂载的根元素上的,如果vm是一个组件之类的,那么他们应该是在父组件的作用于编译/link的,所以需要预先提取出来,因为如果replace为true,el元素会被模板元素替换,但是他上面的属性是会编译link后merge到模板元素上面去。
然后进入到那个两层的if里, extractContent(el),将el的内容(子元素和文本节点)抽取出来,因为如果模板里有slot,那么他们要分发到对应的slot里。
然后就到el = transcludeTemplate(el, options):
/**
 * Process the template option.
 * If the replace option is true this will swap the $el.
 *
 * @param {Element} el
 * @param {Object} options
 * @return {Element|DocumentFragment}
 */

function transcludeTemplate (el, options) {
  var template = options.template
  var frag = parseTemplate(template, true)
  if (frag) {
    // 对于非片段实例情况且replace为true的情况下,frag的第一个子节点就是最终el元素的替代者
    var replacer = frag.firstChild
    var tag = replacer.tagName && replacer.tagName.toLowerCase()
    if (options.replace) {
      /* istanbul ignore if */
      if (el === document.body) {
        process.env.NODE_ENV !== 'production' && warn(
          'You are mounting an instance with a template to ' +
          '<body>. This will replace <body> entirely. You ' +
          'should probably use `replace: false` here.'
        )
      }
      // there are many cases where the instance must
      // become a fragment instance: basically anything that
      // can create more than 1 root nodes.
      if (
        // multi-children template
        frag.childNodes.length > 1 ||
        // non-element template
        replacer.nodeType !== 1 ||
        // single nested component
        tag === 'component' ||
        resolveAsset(options, 'components', tag) ||
        hasBindAttr(replacer, 'is') ||
        // element directive
        resolveAsset(options, 'elementDirectives', tag) ||
        // for block
        replacer.hasAttribute('v-for') ||
        // if block
        replacer.hasAttribute('v-if')
      ) {
        return frag
      } else {
        // 抽取replacer自带的属性,他们将在自身作用域下编译
        options._replacerAttrs = extractAttrs(replacer)
        // 把el的所有属性都转移到replace上面去,因为我们后面将不会再处理el直至他最后被replacer替换
        mergeAttrs(el, replacer)
        return replacer
      }
    } else {
      el.appendChild(frag)
      return el
    }
  } else {
    process.env.NODE_ENV !== 'production' && warn(
      'Invalid template option: ' + template
    )
  }
}首先执行解析parseTemplate(template, true),得到一段存放在documentFragment里的真实dom,然后就判断是否需要replace。(若replace为true)之后判断是否是片段实例,官网已经讲述哪几种情况对应片段实例,而代码里那几个判断就是对应的处理。若不是,那就进入后续的情况,我已经注释代码作用,就不再赘述。我们来说说parseTemplate,因为vue支持template选项写#app这样的HTML选择符,也支持直接存放模板字符串、document fragment、dom元素等等,所以针对各种情况作了区分,如果是一个已经好的dom那几乎不用处理,否则大部分情况下都是执行stringToFragment:
function stringToFragment (templateString, raw) {
// 缓存机制
// try a cache hit first
var cacheKey = raw
? templateString
: templateString.trim()
var hit = templateCache.get(cacheKey)
if (hit) {
return hit
}
//这三个正则分别是/<([\w:-]+)/ 和/&#?\w+?;/和/<!--/
var frag = document.createDocumentFragment()
var tagMatch = templateString.match(tagRE)
var entityMatch = entityRE.test(templateString)
var commentMatch = commentRE.test(templateString)
if (!tagMatch && !entityMatch && !commentMatch) {
// 如果没有tag 或者没有html字符实体(如 ) 或者 没有注释
// text only, return a single text node.
frag.appendChild(
document.createTextNode(templateString)
)
} else {
// 这里如前面的函数签名所说,使用了jQuery 和 component/domify中所使用的生成元素的策略
// 我们要将模板变成实际的dom元素,一个简单的方法的是创建一个div document.createElement('div')
// 然后再设置这个div的innerHtml为我们的模板,
// (不直接创建一个模板的根元素是因为模板可能是片段实例,也就会生成多个dom元素)
// (而设置这个div的outerHtml也不行哈,不能设置没有父元素的outerHtml)
// 但是许多特殊元素只能再固定的父元素下存在,不能直接存在于div下,比如tbody,tr,th,td,legend等等等等
// 那么怎么办? 所以就有了下面这个先获取第一个标签,然后按照map的里预先设置的内容,给模板设置设置好父元素,
// 把模板嵌入到合适的父元素下,然后再层层进入父元素获取真正的模板元素.
var tag = tagMatch && tagMatch[1]
var wrap = map[tag] || map.efault
var depth = wrap[0]
var prefix = wrap[1]
var suffix = wrap[2]
var node = document.createElement('div')
node.innerHTML = prefix + templateString + suffix
// 这里是不断深入,进入正确的dom,
// 比如你标签是tr,那么我会为包上table和tbody元素
// 那么我拿到你的时候应该剥开外层的两个元素,让node指到tr
while (depth--) {
node = node.lastChild
}
var child
/* eslint-disable no-cond-assign */
// 用while循环把所有的子节点都提取了,因为可能是片段实例
while (child = node.firstChild) {
/* eslint-enable no-cond-assign */
frag.appendChild(child)
}
}
if (!raw) {
trimNode(frag)
}
templateCache.put(cacheKey, frag)
return frag
}这个部分的代码就是用来处理我一开始介绍transclude提到的那个把html字符串转换为真正dom的问题。原理在代码的注释里已经说得很清楚了,比如<tr>a</tr>这段dom,那么代码里的tag就匹配上了'tr',map对象是预先写好的一个对象,map['tr']存放的内容就是这么个数组[2, '<table><tbody>', '</tbody></table>'],2表示真正的元素在2层dom里。剩下的两段字符串是用于添加在你的HTML字符串两端(prefix + templateString + suffix),现在innerHTML就设置为了'<table><tbody><tr>a</tr></tbody></table>',不会出现问题了。
现在transclude之后,字符串已经变成了dom。后续的就依据此dom,遍历dom树,提取其中的指令,那如果Vue一开始就没有把字符串转成dom,而是直接解析字符串,提取其中的指令的话,其实工程量是非常大的。一方面要自己构建dom结构,一方面还要解析dom的attribute和内容,而这三者在Vue允许实现自定义组件、自定义指令、自定义prop的情况下给直接分析纯字符串带来了很大难度。所以,实先构造为dom是很有必要的。